|
Details, details...
|
Story & photographs by J.C.Oliphant
So, you've just about completed your restoration and you're down to
the last few details. Typically, the last thing you need is the battery
to get you started on your way so to speak.
Since original batteries are all but gone and those that are left are
so expensive that no reasonable being would even consider actually using
one to start a car with, you've probably decided to use a reproduction
battery. The reproduction batteries are a pretty close facsimile
to the real thing too except for one thing, the date code.
Unless you own a January built 1969 car, the date code found on the
reproduction batteries isn't going to match your car. And if you're
like me and you've gone to a lot of trouble to make sure that the date
codes on your car are appropriate to your car's vintage, this is going
to bug you.
Fortunately, with a little ingenuity, and simple tools that can be found
in the pocket of your average engineer, you can create a new label for
your battery that is properly encoded.
|
|
There's Usually a Starbuck's Next Door
|
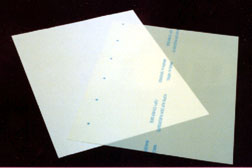 The first thing you need is some laser-label paper and "sticky-back" clear plastic designed
for laser printers. You can find this at any of the office supply
stores like Office Max or Staples, or if you tend to do these projects
late at night as I do, Kinko's has them and they sell individual sheets.
The first thing you need is some laser-label paper and "sticky-back" clear plastic designed
for laser printers. You can find this at any of the office supply
stores like Office Max or Staples, or if you tend to do these projects
late at night as I do, Kinko's has them and they sell individual sheets.
|
Artistic License
Once you have the paper, download the scan of the battery label that
I have conveniently provided for you and load the image into your graphics
program. You can then use a little digital artistry to rearrange
the date code. The date code is in the format Year-Month-Inspector
code. You need to change the date code on the label to match the
build date of your car.
The date code for the months are:
A- January
B - February
C - March
D - April
E - May
F - June
G - July
H - August
J - September
K - October
L - November
M - December
The battery date code should be the same year/month of your car unless
it was built at the beginning of the month. In that case, just use
the previous month. I have provided some approximations of the original
fonts used. These are based on some guesswork though so feel free
to do your own research and artistry.
More is Better
|
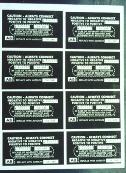 Once you have the changes made, I suggest you create a larger image and paste
several copies of the battery label. You can fit up to eight copies
on a single page as shown here. This allows for some practice and
the inevitable slip-ups that will happen when you go to create the label.
Once you have the page created, you need to print it out on the laser-label
paper. The scan I've provided is at 300 dpi so you need to make sure
your printer is set accordingly. I strongly suggest you use a laser
printer. Even the best inkjet type printer won't give you the results
that even a so-so laser printer will give you. If you don't have
access to one, take your image file back down to Kinko's and have them
print it out for you.
Once you have the changes made, I suggest you create a larger image and paste
several copies of the battery label. You can fit up to eight copies
on a single page as shown here. This allows for some practice and
the inevitable slip-ups that will happen when you go to create the label.
Once you have the page created, you need to print it out on the laser-label
paper. The scan I've provided is at 300 dpi so you need to make sure
your printer is set accordingly. I strongly suggest you use a laser
printer. Even the best inkjet type printer won't give you the results
that even a so-so laser printer will give you. If you don't have
access to one, take your image file back down to Kinko's and have them
print it out for you.
Plastic Fantastic
|
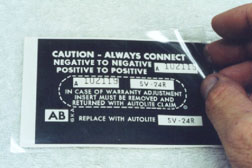 Here's where that "sticky-back" stuff comes in. Cut out one of the labels and
a similarly sized piece of the plastic, peel off the backing and apply
it over your label as shown here. That little trick will give your
label a near identical look to the original one used on the battery.
Here's where that "sticky-back" stuff comes in. Cut out one of the labels and
a similarly sized piece of the plastic, peel off the backing and apply
it over your label as shown here. That little trick will give your
label a near identical look to the original one used on the battery.
|
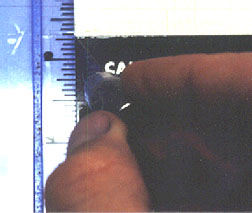 Then, using a straight-edge and an X-Acto knife, trim the edges of the label.
Place the straight-edge on the outside to avoid indentations in the plastic.
Then, using a straight-edge and an X-Acto knife, trim the edges of the label.
Place the straight-edge on the outside to avoid indentations in the plastic.
|
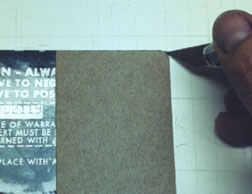 To round off the edges, make a template out of a piece of stiff cardboard or plastic.
Using the original label on your battery as a guide, find something with
a similar radius and use it as a guide for your X-Acto. One of those
Bic pens with the plastic end cap removed stood on end works well.
To round off the edges, make a template out of a piece of stiff cardboard or plastic.
Using the original label on your battery as a guide, find something with
a similar radius and use it as a guide for your X-Acto. One of those
Bic pens with the plastic end cap removed stood on end works well.
|
|
A Penny Saved
|
 Next, you need to reproduce the die-cut look of the removable warranty insert. It
so happens, that a US penny is exactly the right diameter.
Next, you need to reproduce the die-cut look of the removable warranty insert. It
so happens, that a US penny is exactly the right diameter.
|
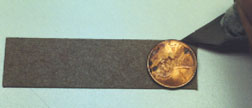 To again avoid indentations in the plastic from holding down a guide for your knife, cut
out another piece of 2 7/8" x 3/4" cardboard and use the penny to get the
rounded ends. Then, place the cardboard on the label and trace
around it with your knife.
To again avoid indentations in the plastic from holding down a guide for your knife, cut
out another piece of 2 7/8" x 3/4" cardboard and use the penny to get the
rounded ends. Then, place the cardboard on the label and trace
around it with your knife.
|
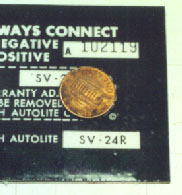
 Finally, remove the old label from your battery, peel the backing off of your newly created
label, and apply it to the battery. As shown here, this relatively
simple procedure can give you strikingly good results. This method
can also be used to create other similar labels. Most notably the
small labels found on various wiring looms.
Finally, remove the old label from your battery, peel the backing off of your newly created
label, and apply it to the battery. As shown here, this relatively
simple procedure can give you strikingly good results. This method
can also be used to create other similar labels. Most notably the
small labels found on various wiring looms.
|