|
Brushstrokes of the Old Masters
|
Story & photographs by J.C.Oliphant
 When restoring any classic car, one of your toughest problems can be in dealing with all that chromed trim. While not nearly so resplendent as their
siblings of a decade earlier, 1960's Fords do have a fair share of the shiny stuff. At least, it used to be shiny.
Some thirty years later, most chromeplate is a mass of scratches, nicks, or those deep blemishes called "pits". And, with so much chrome around us, there's just no ignoring
this situation.
When restoring any classic car, one of your toughest problems can be in dealing with all that chromed trim. While not nearly so resplendent as their
siblings of a decade earlier, 1960's Fords do have a fair share of the shiny stuff. At least, it used to be shiny.
Some thirty years later, most chromeplate is a mass of scratches, nicks, or those deep blemishes called "pits". And, with so much chrome around us, there's just no ignoring
this situation.
If you have enough time or money, you might be able to find better parts. And, if you're willing to accept a bit less originality, cheap replacements for some parts are
now available. But there are a few pieces so rare that even diligence, deep pockets, and low standards won't help you! Any list of such parts would surely include the
"brushed" console trim found in 1967 Mustangs and other FoMoCo cars of this period. (Notable examples are 1965-66 Galaxies and 1970-71 Torinos -- Ed.)
|
Search and Rescue
 You've probably heard these parts referred to as "brushed aluminum", or "brushed stainless". In reality, they're made of a zinc-based alloy called
pot metal. Its a popular base material, cheap and easy to cast, but must be coated to prevent corrosion.
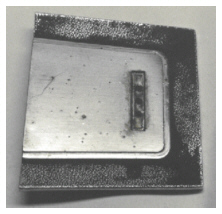
Some protection (as well as that shiny, textured look) was added by Ford's unique plating process. Sadly, this treatment didn't hold up in anything harsher than
climate-controlled storage. That's why most of our console trim now looks like the ashtray lid, at left.
You've probably heard these parts referred to as "brushed aluminum", or "brushed stainless". In reality, they're made of a zinc-based alloy called
pot metal. Its a popular base material, cheap and easy to cast, but must be coated to prevent corrosion.
Some protection (as well as that shiny, textured look) was added by Ford's unique plating process. Sadly, this treatment didn't hold up in anything harsher than
climate-controlled storage. That's why most of our console trim now looks like the ashtray lid, at left.
Since good replacements are scarce, you might think about using a professional replating service. There are two big problems with
this option: poor results & high cost. Most chrome shops do everything by machine, resulting in a part that's had most of its defining ridges buffed off. So, unless you
find someone with the expertise and willingness to duplicate a "concours" look, your only option is to do it yourself.
But are your parts good enough for reconditioning? Deep pits are probably a lost cause, at least for a do-it-yourselfer. The ashtray lid shown above does have
potential, but I'd say its at the lower end of usability. Any worse than this, better hit the swaps or the online classifieds. Ideally, look for parts that have pitting
in accessible places ....like those on the "brushed" surface. Avoid parts with pitting on the shallow "step" surrounding this area.
NEXT: Duck and Cover?
The Journey Begins
Lining up a plater may be your biggest challenge, since most hate pot metal parts. Be prepared to dodge rouge sticks, buffing wheels, or other tools of the trade if
you meet a plater who's had one bad experience too many! Even when you find one who's more receptive, cautiously explain the process to him. Despite its simplicity,
he may see this as too much of a pain, or even as a personal attack on his craftsmanship. Getting past these objections takes tact, humility, and lots of self-deprecating words.
Tell him you had your first date in this car, or talk about how anal-retentive you are....and keep smiling.
After arranging for a shop, the next step is to strip the plating from those parts. Basically, Ford's pot metal was plated in three stages: a layer of copper coats
the base metal, both to fill in any minor imperfections and because chromium won't directly adhere to pot metal. Over this goes a layer of nickel, which produces that nice, shiny
finish we expect. Finally, the layer of chromium adds its own "bluish" tint and, being harder than nickel, forms a somewhat more durable surface.
Chromium is easy to remove, so that's the first thing you'll ask your plater (now, a dear friend) to do. A dip in
one of his burbling tanks will quickly strip your parts, right down to the nickel layer. Chemical
processes are available to remove the nickel and copper, but these leave behind a rough surface. That's why professionals must have all those polishing wheels and buffing
compounds. And that's why I suggested leaving the nickel as intact as possible. Otherwise, you'll find it difficult to keep that "grained leather" texture in the painted
areas.
Tool Time
|
 On your way home, stop for hardware supplies. Grab some #80 or #100 emery cloth, plus lots of #220, #320, #400, and #600 wet/dry
paper. And, if you don't own one, I recommend buying a rotary sanding attachment of an appropriate size. They can be used with a die-grinder or any electric drill, but you'll
need some of the special sanding disks made for this tool. Lastly, arrange for the following tools: a couple small metal or hard ceramic blocks, a 1/8" triangular cross-section
file, a 1/2" half-round file, and a spray bottle for wet sanding.
On your way home, stop for hardware supplies. Grab some #80 or #100 emery cloth, plus lots of #220, #320, #400, and #600 wet/dry
paper. And, if you don't own one, I recommend buying a rotary sanding attachment of an appropriate size. They can be used with a die-grinder or any electric drill, but you'll
need some of the special sanding disks made for this tool. Lastly, arrange for the following tools: a couple small metal or hard ceramic blocks, a 1/8" triangular cross-section
file, a 1/2" half-round file, and a spray bottle for wet sanding.
|
 Let's consider the "brushed" section first, since that's usually in the worst shape. You'll probably have to sand through the nickel and copper layers, maybe even removing some
pot metal before you get a flat, smooth surface. To start, I recommend using the rotary sanding disk. Be sure to layer duct tape over anything you want to protect from the
sander. And be careful - a disk cuts through plating very quickly. Stop when you notice a fair amount of the copper showing through. As seen here, this appears
as faint patches of orange or yellow.
Let's consider the "brushed" section first, since that's usually in the worst shape. You'll probably have to sand through the nickel and copper layers, maybe even removing some
pot metal before you get a flat, smooth surface. To start, I recommend using the rotary sanding disk. Be sure to layer duct tape over anything you want to protect from the
sander. And be careful - a disk cuts through plating very quickly. Stop when you notice a fair amount of the copper showing through. As seen here, this appears
as faint patches of orange or yellow.
Grunt Work
Here's where you're going to need a bucketful of elbow grease. Wrap some 80 grit emery cloth around one of those metal blocks, then start sanding. For awhile,
it may seem as if nothing is happening and it will take a great deal of determination to press on. All I can say is that it can be done. I find it helps to have
the radio going, maybe watch TV, or just find a nice location to do your sanding. (I did a lot of mine under a tree in Brookside Park, in Pasadena.)
You will probably find one or two pits are deeper than the others, making it tempting to go after them with just the tip of your finger in the sandpaper. Try your best to
resist this urge. The result will be depressions that are hard to notice before plating, but afterward even an Old Salt will
get woozy looking at the waves you've created! Likewise, take care that you hold the block perfectly flat while sanding near the edges, so as not to round them off.
|
 Once you've gone far enough to remove the pits, use increasingly finer grits until you're satisfied with the results. Remember - the smoother your base metal, the better your
final product will look. I suggest wetting down the surface to reduce friction and minimize swirls, but you don't need a mirror finish. And you can always refine it further
after the first layer of plating has been re-applied. For corners, I break off a small chunk of file. This "mini-block" is great alone or when wrapped in sandpaper
(left), but it can be very tedious work.
Once you've gone far enough to remove the pits, use increasingly finer grits until you're satisfied with the results. Remember - the smoother your base metal, the better your
final product will look. I suggest wetting down the surface to reduce friction and minimize swirls, but you don't need a mirror finish. And you can always refine it further
after the first layer of plating has been re-applied. For corners, I break off a small chunk of file. This "mini-block" is great alone or when wrapped in sandpaper
(left), but it can be very tedious work.
Does the finish meet with your approval yet? If so, then head back to the plater's for a copper bath. (Some shops will claim they can't plate over the old nickel, so
clear this with your new pal during the initial negotiations.) Copper reveals flaws that will persist after chroming, so be sure to get ‘em out, now. Otherwise, just polish
the part with a piece of #600 paper and lots of water. Work carefully, especially around the edges, because if you sand through the copper it will have to be reapplied.
Next, take the polished parts back to be nickeled. After this step, it will be obvious if you couldn't resist sanding those pits without a block! Still, your
parts are shiny and bright as can be. Should you feel the need, you can even do some minor polishing with a buffing wheel. But, take great care if you do - the plating is
not as thick as it looks. If your wheel burns through a layer, you'll have to start over.
The Home Stretch
|
 You've nearly reached the end of your ordeal! And, in fact, this is probably the easiest step in our process. Before one last round of plating, you must
re-create the "brushed" texture. Most people assume those shallow scuffs are in the chrome layer, but - and here's the big secret - its the nickel layer we must attack.
For this, you'll need one sheet of a medium grade Scotch-Brite® abrasive, some duct tape, and a short length of
straight board.
You've nearly reached the end of your ordeal! And, in fact, this is probably the easiest step in our process. Before one last round of plating, you must
re-create the "brushed" texture. Most people assume those shallow scuffs are in the chrome layer, but - and here's the big secret - its the nickel layer we must attack.
For this, you'll need one sheet of a medium grade Scotch-Brite® abrasive, some duct tape, and a short length of
straight board.
First, use tape to mask off the "step" and any "grained" areas. Next, secure the part to your work surface - here, I've used more duct tape. Likewise, secure the
board alongside the part. This will serve as a guide-fence, helping to keep your "brush" marks straight. Then, simply rub your
Scotch-Brite® pad back & forth until you've produced a nice, even
pattern in the nickel. It won't take much effort, so don't get too carried away.
|
 Once done, its back to the shop for the layer of chromeplate. When the parts come back (and after oohing and ahhing about how shiny they are!), you
need only to mask off and paint the grained sections. Its important to note that factory paint tended to be more "flat" than "glossy". I find
Seymour's Universal Solvent Blend Black Lacquer most closely matches this look, so I used their
"1964-1966 Black" sold by National Parts Depot as (p/n AP-946). For best results, always shoot the parts using a few, light coats. In addition to providing fresh air,
spraying outdoors on a warm day can also help you get the desired finish. Strip off the tape and you're ready for showtime!
Once done, its back to the shop for the layer of chromeplate. When the parts come back (and after oohing and ahhing about how shiny they are!), you
need only to mask off and paint the grained sections. Its important to note that factory paint tended to be more "flat" than "glossy". I find
Seymour's Universal Solvent Blend Black Lacquer most closely matches this look, so I used their
"1964-1966 Black" sold by National Parts Depot as (p/n AP-946). For best results, always shoot the parts using a few, light coats. In addition to providing fresh air,
spraying outdoors on a warm day can also help you get the desired finish. Strip off the tape and you're ready for showtime!
Where this lid is relatively simple, other parts will require some ingenuity. For example, our console's front panel must be separated from other parts to which it was
"riveted" by the manufacturer. This requires a thin-bladed screwdriver, lots of patience, and gentle pressure all around. During reassembly, you might need to put just a
dab of epoxy adhesive where each rivet passes through the housing. I find JB Weld® works very well for this purpose, if you first
abrade the surfaces slightly. This gives extra adhesion and assures a solid bond.
Never Say Die
|
 I sincerely hope this article has encouraged you to try it, yourself. If nothing else, the price is right - about $50 for materials, plus maybe another $200 for all plating
operations, combined. Still, there's no denying this won't be the easiest 'DIY' project you've ever read about. Nor is it one you can complete over the course of a single
weekend. And, yes - it's very easy to get discouraged by all that sanding. But, now that you've learned the secrets, its just a matter of taking your time and
frequently checking your work. With enough patience, you really can achieve results like those shown here.
I sincerely hope this article has encouraged you to try it, yourself. If nothing else, the price is right - about $50 for materials, plus maybe another $200 for all plating
operations, combined. Still, there's no denying this won't be the easiest 'DIY' project you've ever read about. Nor is it one you can complete over the course of a single
weekend. And, yes - it's very easy to get discouraged by all that sanding. But, now that you've learned the secrets, its just a matter of taking your time and
frequently checking your work. With enough patience, you really can achieve results like those shown here.
|
|